1. 예제 설명
sampleDiv의 width를 다양한 방법으로 구해서 Console에 출력하는 예제입니다.
2. HTML, CSS 코드
<div id="sampleDiv">
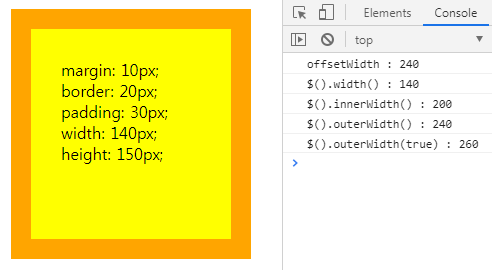
margin: 10px; </br>
border: 20px; </br>
padding: 30px; </br>
width: 140px; </br>
height: 150px;
</div>#sampleDiv{
margin: 10px;
border: 20px solid orange;
padding: 30px;
width: 140px;
height: 150px;
background-color: yellow;
}
3. JavaScript, jQuery 코드와 결과

var div = document.querySelector("#sampleDiv");
//offsetWidth = width + padding*2 + border*2 = 240
console.log("offsetWidth : " + div.offsetWidth);
//$().width() = width = 140
console.log("$().width() : " + $(div).width());
//$().innerWidth() = width + padding*2 = 200
console.log("$().innerWidth() : " + $(div).innerWidth());
//$().outerWidth() = width + padding*2 + border*2 = 240
console.log("$().outerWidth() : " + $(div).outerWidth());
//$().outerWidth(true) = width + padding*2 + border*2 + margin*2 = 260
console.log("$().outerWidth(true) : " + $(div).outerWidth(true));margin과 padding을 표현하기 위해서 회색 선을 추가했습니다.
제이쿼리를 사용하면 width를 다양하게 구할 수 있음을 알 수 있습니다.
width를 height로 바꾸면 높이도 다양하게 구할 수 있습니다.
6. 전체 코드
<!DOCTYPE html>
<html>
<head>
<meta charset="UTF-8" />
<title>Credit Card Network Detector</title>
<script src="https://code.jquery.com/jquery-3.4.1.min.js" integrity="sha256-CSXorXvZcTkaix6Yvo6HppcZGetbYMGWSFlBw8HfCJo=" crossorigin="anonymous"></script>
<style>
#sampleDiv{
	margin: 10px;
	border: 20px solid orange;
	padding: 30px;
	width: 140px;
	height: 150px;
	background-color: yellow;
}
</style>
</head>
<body>
<div id="sampleDiv">
margin: 10px; </br>
border: 20px; </br>
padding: 30px; </br>
width: 140px; </br>
height: 150px;
</div>
</body>
<script>
  var div = document.querySelector("#sampleDiv");

  //offsetWidth = width + padding*2 + border*2 = 240
  console.log("offsetWidth : " + div.offsetWidth);

  //$().width() = width = 140
  console.log("$().width() : " + $(div).width());

  //$().innerWidth() = width + padding*2 = 200
  console.log("$().innerWidth() : " + $(div).innerWidth());

  //$().outerWidth() = width + padding*2 + border*2 = 240
  console.log("$().outerWidth() : " + $(div).outerWidth());

  //$().outerWidth(true) = width + padding*2 + border*2 + margin*2 = 260
  console.log("$().outerWidth(true) : " + $(div).outerWidth(true));
</script>
</html>'JavaScript' 카테고리의 다른 글
| 일반 함수의 this, bind()와 화살표 함수의 this 비교 (0) | 2019.08.22 |
|---|---|
| XMLHttpRequest, jQuery Ajax 예제 (0) | 2019.08.12 |
