1. 시작하며

이 포스팅은 간단한 git 사용법에 대해서만 다루고 있습니다.

저는 C언어를 공부하면서 푼 연습문제나 알고리즘 문제들을 저장할 목적으로 사용하고 있으며,

협업을 하고 있지 않기 때문에 혼자서 add, commit, push하는 과정만 포스팅하겠습니다.

더 많은 기능 사용법을 원하시는 분들은 구글링을 추천드립니다!


2. Git 설치하기


Git - Downloads

Downloads Mac OS X Windows Linux/Unix Older releases are available and the Git source repository is on GitHub. GUI Clients Git comes with built-in GUI tools (git-gui, gitk), but there are several third-party tools for users looking for a platform-specific

git-scm.com

위의 링크를 통해 git을 설치합니다.


3. 깃허브 Repository 만들기

깃허브에 로그인한 후 오른쪽 위에 있는 +버튼을 누르고 'New repository'를 선택합니다.

Repository name을 입력하고, 공개(Public)로 할지 비공개(Private)로 할지 선택 후 Create repository를 클릭합니다.


4. gitconfig 설정 하기

윈도우 버튼을 누른 후 'Git Bash'를 검색해서 실행합니다.


위의 명령어를 입력하여 commit에 사용할 name과 email을 설정합니다.


5. 초기 설정과 Push하기

저장하고 싶은 파일들이 있는 폴더를 열고 오른쪽 클릭 후 'Git Bash Here'을 클릭합니다.


git init 명령어를 입력하여 현재 폴더를 로컬 저장소로 설정합니다.


git status 명령어를 입력하여 현재 상태를 확인합니다.


git add [파일명 or 폴더명] 명령어를 입력하여 추가합니다.

저는 .c로 끝나는 모든 파일을 추가하고 싶어서 *.c를 입력했습니다.

참고로 git add . 을 입력하면 현재 폴더에 있는 모든 파일들을 추가합니다.

또, 현재 이 폴더에는 aaa.c, abc.c, bbb.c라는 세 개의 c파일이 있는데

이때 git add b를 입력한 후 tab키를 누르면 bb.c가 자동으로 입력되어 git add bbb.c 명령어가 완성됩니다.

a로 시작하는 파일은 2개가 있으므로 이런 경우에는 한 글자 더 입력한 후 tab키를 누르면 자동완성이 됩니다.


git commit -m [message] 명령어를 이용하여 commit합니다.


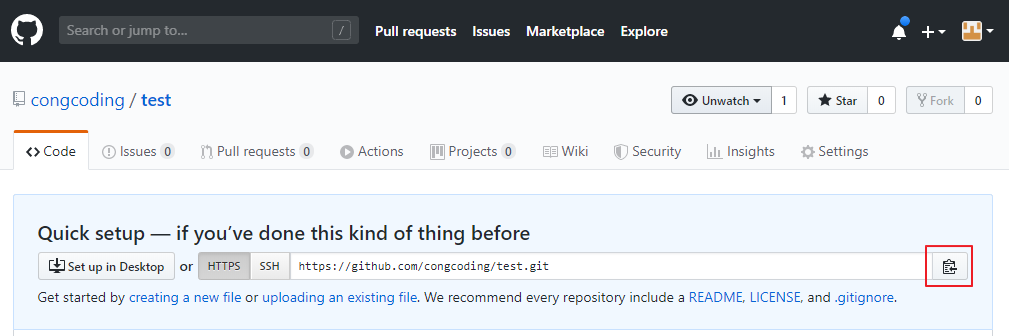
git remote add origin [repository 주소] 명령어를 이용하여 github repository와 연동합니다.

repository 주소는 깃허브 repository 페이지에서 확인할 수 있습니다. 빨간 박스 버튼을 누르면 복사가 됩니다.

Git Bash에서는 Shift+Insert가 붙여넣기 단축키이고, 오른쪽 클릭 후 Paste를 클릭해도 됩니다.


git push origin master 명령어를 이용하여 원격 저장소에 push합니다.


이 과정까지 마친 후 깃허브 repository 페이지에 들어가 보면 push된 것을 확인할 수 있습니다.


6. 초기 설정 이후 Push 하기

git status 명령어를 이용하여 현재 상태를 확인합니다.

add할 파일명을 알고 있거나, add ., add *.c 명령어를 사용할 거면 생략해도 됩니다.


git add [파일명 or 폴더명]
git commit -m "message"
git push origin master 명령어를 차례로 입력합니다.

아까와 동일한 과정이지만 해당 폴더가 원격 저장소와 연결되어 있기 때문에

앞으로는 add, commit, push 명령어만 입력하면 됩니다.

1. 예제 설명

sampleDiv의 width를 다양한 방법으로 구해서 Console에 출력하는 예제입니다.


2. HTML, CSS 코드

<div id="sampleDiv">
	margin: 10px; </br>
	border: 20px; </br>
	padding: 30px; </br>
	width: 140px; </br>
	height: 150px;
</div>
#sampleDiv{
	margin: 10px;
	border: 20px solid orange;
	padding: 30px;
	width: 140px;
	height: 150px;
	background-color: yellow;
}


3. JavaScript, jQuery 코드와 결과

  var div = document.querySelector("#sampleDiv");
  
  //offsetWidth = width + padding*2 + border*2 = 240
  console.log("offsetWidth : " + div.offsetWidth);

  //$().width() = width = 140
  console.log("$().width() : " + $(div).width());

  //$().innerWidth() = width + padding*2 = 200
  console.log("$().innerWidth() : " + $(div).innerWidth());

  //$().outerWidth() = width + padding*2 + border*2 = 240
  console.log("$().outerWidth() : " + $(div).outerWidth());

  //$().outerWidth(true) = width + padding*2 + border*2 + margin*2 = 260
  console.log("$().outerWidth(true) : " + $(div).outerWidth(true));

margin과 padding을 표현하기 위해서 회색 선을 추가했습니다.

제이쿼리를 사용하면 width를 다양하게 구할 수 있음을 알 수 있습니다.

width를 height로 바꾸면 높이도 다양하게 구할 수 있습니다.


6. 전체 코드

<!DOCTYPE html>
<html>
  <head>
    <meta charset="UTF-8" />
    <title>Credit Card Network Detector</title>
    <script src="https://code.jquery.com/jquery-3.4.1.min.js" integrity="sha256-CSXorXvZcTkaix6Yvo6HppcZGetbYMGWSFlBw8HfCJo=" crossorigin="anonymous"></script>
    <style>
    #sampleDiv{
        margin: 10px;
        border: 20px solid orange;
        padding: 30px;
        width: 140px;
        height: 150px;
        background-color: yellow;
    }
    </style>
  </head>
  <body>
    <div id="sampleDiv">
        margin: 10px; </br>
        border: 20px; </br>
        padding: 30px; </br>
        width: 140px; </br>
        height: 150px;
    </div>
  </body>

  <script>
  var div = document.querySelector("#sampleDiv");

  //offsetWidth = width + padding*2 + border*2 = 240
  console.log("offsetWidth : " + div.offsetWidth);

  //$().width() = width = 140
  console.log("$().width() : " + $(div).width());

  //$().innerWidth() = width + padding*2 = 200
  console.log("$().innerWidth() : " + $(div).innerWidth());

  //$().outerWidth() = width + padding*2 + border*2 = 240
  console.log("$().outerWidth() : " + $(div).outerWidth());

  //$().outerWidth(true) = width + padding*2 + border*2 + margin*2 = 260
  console.log("$().outerWidth(true) : " + $(div).outerWidth(true));
  </script>

</html>

1. highlight.js 적용하기

먼저 검색을 통해 highlight.js를 적용해주세요.


2. highlights-line-numbers.min.js 적용하기

<!-- Line Number 적용 -->
<script src="//cdnjs.cloudflare.com/ajax/libs/highlightjs-line-numbers.js/2.7.0/highlightjs-line-numbers.min.js"></script>
<script>hljs.initLineNumbersOnLoad();</script>

블로그 관리 - 꾸미기 - 스킨 편집 - html 편집 - HTML에 위의 코드를 추가합니다.


3. CSS 적용하기

/* Line Number CSS */
/* for block of numbers */
.hljs-ln-numbers {
    -webkit-touch-callout: none;
    -webkit-user-select: none;
    -khtml-user-select: none;
    -moz-user-select: none;
    -ms-user-select: none;
    user-select: none;

    text-align: center;
    color: #ccc;
    border-right: 1px solid #CCC;
    vertical-align: top;
    padding-right: 5px;

    /* your custom style here */
}

/* for block of code */
.hljs-ln-code {
    padding-left: 10px;
}

블로그 관리 - 꾸미기 - 스킨 편집 - html 편집 - CSS에 위의 코드를 추가합니다.


4. 결과

이 부분은 블로그 스킨, highlight.js의 스타일에 따라 조금씩 다를 것 같습니다.

저는 Square 스킨, github-gist 스타일을 사용하고 있는데,

라인 넘버 width가 통일되지 않고, 코드 왼쪽에 여백이 적용되지 않는 문제가 있어서 커스텀했습니다.


5. 커스텀 하기

/* Line Number CSS */
/* for block of numbers */
.hljs-ln-numbers {
	-webkit-touch-callout: none;
	-webkit-user-select: none;
	-khtml-user-select: none;
	-moz-user-select: none;
	-ms-user-select: none;
	user-select: none;

	text-align: center;
	color: #ccc;
	border-right: 1px solid #CCC;
	vertical-align: top;
	width: 25px;
}

/* your custom style here */
.hljs-ln td.hljs-ln-code {
	padding-left: 5px;
}

3. CSS 적용하기에서 붙여 넣기 했던 코드를 위의 코드로 바꿔줍니다.


6. 커스텀 결과

커스텀한 결과 라인 넘버 width와 코드 왼쪽 여백이 수정된 것을 볼 수 있습니다.

꼭 저와 동일한 width와 여백을 설정할 필요는 없습니다.

라인 넘버 width를 바꾸고 싶으면 5. 커스텀 하기 코드 15번 라인의 width값을 바꾸면 되고,

코드 왼쪽 여백을 바꾸고 싶으면 5. 커스텀 하기 코드 20번 라인의 padding-left값을 바꾸면 됩니다.


7. 참고 자료


wcoder/highlightjs-line-numbers.js

Line numbering plugin for Highlight.js . Contribute to wcoder/highlightjs-line-numbers.js development by creating an account on GitHub.

github.com


+ Recent posts